Self-Hosting Ghost
Get Ghost running on Ubuntu Server (22) and Cloudflare

What you will need:
- Ubuntu Server running somewhere; I don't care where
- Cloudflare Account, know we will be using Cloudflare Tunnels
- The ability to read carfully
Part 1: Getting Your VM Ready
This part is the foundation, so don't skip any steps here...
- Spin up an Ubuntu 22 server with the following minimum specs:
- 32 GB disk space
- 2 CPU Cores
- 2 GB RAM
- LVM Group - Your call. I went with the simple full disk no LVM
- SSH into your new server and follow your cloud provider's instructions. Since in this example I'll be self-hosting on my hardware, mine will look like the following:
ssh [email protected]- At this point, I'd recommend getting all the updates and upgrades out of the way, so type the following:
sudo apt update && sudo upgrade -yPart 2: Getting a Cloudflare Tunnel
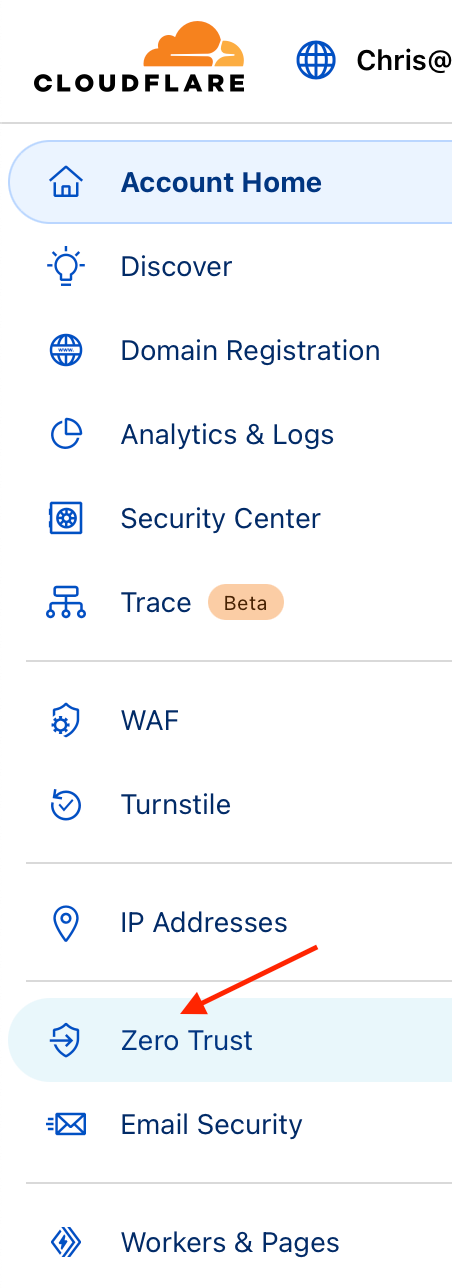
- Log in to Cloudflare, and on the landing page Zero Trust
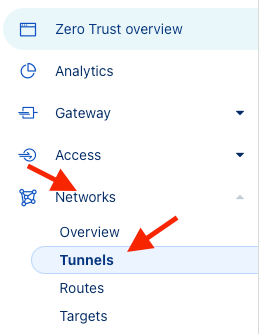
- That takes you to your accounts' Zero Trust landing page. Ignore everything on the page except Network, give that button a little ,tickle and select Tunnels from the dropdown list.
- Click the create a tunnel button...

- You will have two options at this point, Cloudflared or WARP Connector... Pick Cloudflared
- Name your tunnel
- On the Install and run connectors tab, choose Debian (but you said Ubuntu! Guess what, Ubuntu is based on Debian...)
- Copy BOTH code boxes in the Install and run a connector, paste them somewhere safe, and seriously, do not store them anywhere public!
- Jump back to your SSH Session.
Part 3: Installing Cloudflare's Tunnel
- Paste the first block of code into your terminal, it should look something like this:
# Add cloudflare gpg key
sudo mkdir -p --mode=0755 /usr/share/keyrings
curl -fsSL https://pkg.cloudflare.com/cloudflare-main.gpg | sudo tee /usr/share/keyrings/cloudflare-main.gpg >/dev/null

# Add this repo to your apt repositories
echo 'deb https://pkg.cloudflare.com/cloudflared any main' | sudo tee /etc/apt/sources.list.d/cloudflared.list

# install cloudflared
sudo apt-get update && sudo apt-get install cloudflared- Next, paste the second block of code It should look something like this:
sudo cloudflared service install SOMEBIGASSTOKENKJDALKDJLAKSJDLAHSDJKDJKioj32oi4j32o4j23o4jo32i4jokjfdsjfsjfoaidjf9303432ji$42069- Jump back to Cloudflare (Zero Trust tunnel page... I sure hope you didn't already close it out) and check to see that your VM is connected. You should see VM on the active clients list at the bottom of the page; if not, give it a second.
- Click Next...
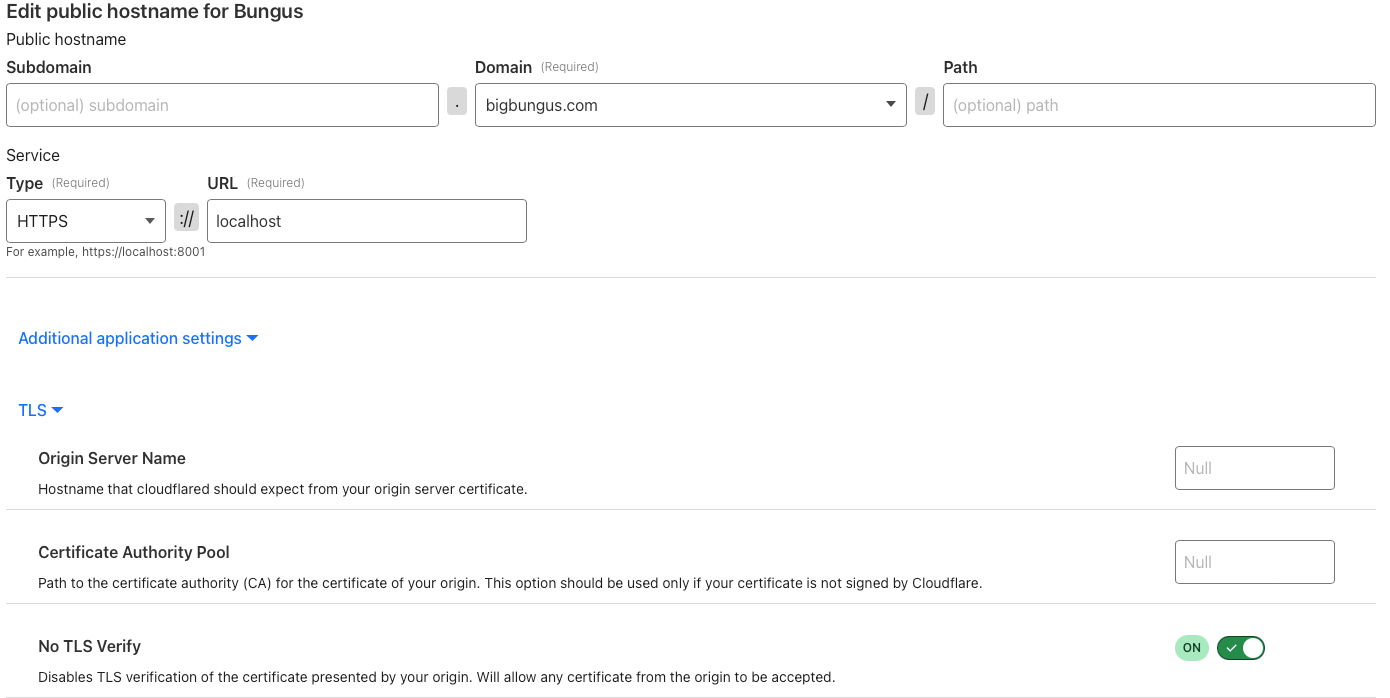
- Public Hostname: OK, so this is the big one. Select your domain and HTTPS, drop down additional application settings, and for easy mode settings No TLS Verify to on (more on this later, we will be using Cloud Flair's TLS)
Part 4: Setting up Ghost
- Back to your SSH Session, if you are NOT in root type the following
sudo su- Create a new user for Ghost and don't call it Ghost.... That WILL cause a ton of issues. Get ready to answer a lot of questions. Just keep hitting enter (besides the password, you want a password)
adduser boo- Give the user Sudo ability
usermod -aG sudo boo- Let's log in as our new user
su - boo- Since I made you do the update earlier, this is optional, but let's do another update and upgrade.
sudo apt update && sudo apt upgrade -y- NGINX Setup time! Start by installing Nginx
sudo apt-get install nginx- Open the firewall for nginx
sudo ufw allow 'Nginx Full'- Moving on to MySQL, let it be known I'm more of a Postgres, Duckdb/SQLite man myself, but MySQL is recommended, so MySQL it is.
sudo apt-get install mysql-server- Config MySQL, I'll keep each steap its own code block so you get some easy copy and paste and get to skip all the weird errors
# Enter mysql
sudo mysql
Note: Change the SomePasswordHere, please...
# Update permissions
ALTER USER 'root'@'localhost' IDENTIFIED WITH 'mysql_native_password' BY 'SomePasswordHere';
# Reread permissions
FLUSH PRIVILEGES;# exit mysql
exit- NodeJS Time, hang in there; we are almost done!
# Download and import the Nodesource GPG key
sudo apt-get update
sudo apt-get install -y ca-certificates curl gnupg
sudo mkdir -p /etc/apt/keyrings
curl -fsSL https://deb.nodesource.com/gpgkey/nodesource-repo.gpg.key | sudo gpg --dearmor -o /etc/apt/keyrings/nodesource.gpg
# Create deb repository
NODE_MAJOR=18 # Use a supported version
echo "deb [signed-by=/etc/apt/keyrings/nodesource.gpg] https://deb.nodesource.com/node_$NODE_MAJOR.x nodistro main" | sudo tee /etc/apt/sources.list.d/nodesource.list
# Run update and install
sudo apt-get update
sudo apt-get install nodejs -y- Installing the Ghost-CLI
sudo npm install ghost-cli@latest -g- Installing Ghost itself, create a directory for your site
Create directory: Change `sitename` to whatever you like
sudo mkdir -p /var/www/<websitename>- Change the owner
sudo chown boo:boo /var/www/<websitename>- Set the permissions
sudo chmod 775 /var/www/<websitename>- CD into that sucker
cd /var/www/<websitename>- Installing Ghost
ghost installQuestion Shortcuts (if you don't want to read)
- Website Name: <youwebsitename>
- MySQLHost: hit enter
- MySWl Username: root
- MySQL PW: password for MySQL
- DB Name: hit enter
- Setup MySQL User: y
- Setup NGINX: y
- SSL: N (more on this later)
- Start Ghost/Systemd: y
Getting your SSL set up!
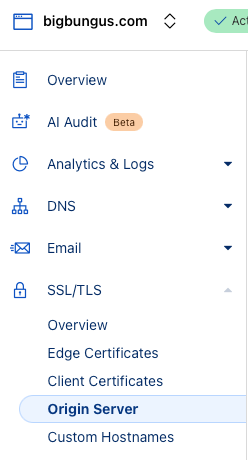
- Head over to Cloudflare. Again, this time on the home page, select your domain
- Click SSL/TLS and select Origin Server
- Leave everything as is and select create
- copy the Origin Certificate and head back to your SSH Session
- Type the following:
sudo nano /etc/ssl/cert.pem- Paste the cert inside and save and exit
- Do the same for the key but under the following location
/etc/ssl/key.pem- Update nginx config
sudo nano /etc/nginx/sites-available/<sitename>.conf- Replace everything in that file with your version of the following:
map $status $header_content_type_options {
    204 "";
    default "nosniff";
}

server {
    listen 443 ssl http2;
    listen [::]:443 ssl http2;

    server_name bigbungus.com;
    root /var/www/<sitename>/system/nginx-root;

    ssl_certificate /etc/ssl/cert.pem;
    ssl_certificate_key /etc/ssl/key.pem;


    location / {
        proxy_set_header X-Forwarded-For $proxy_add_x_forwarded_for;
        proxy_set_header X-Forwarded-Proto $scheme;
        proxy_set_header X-Real-IP $remote_addr;
        proxy_set_header Host $http_host;
        proxy_pass http://127.0.0.1:2368;

        add_header X-Content-Type-Options $header_content_type_options;
    }

    location ~ /.well-known {
        allow all;
    }

    client_max_body_size 1g;
}- Reboot and and login to <yoursite>.com/ghost